TLDR
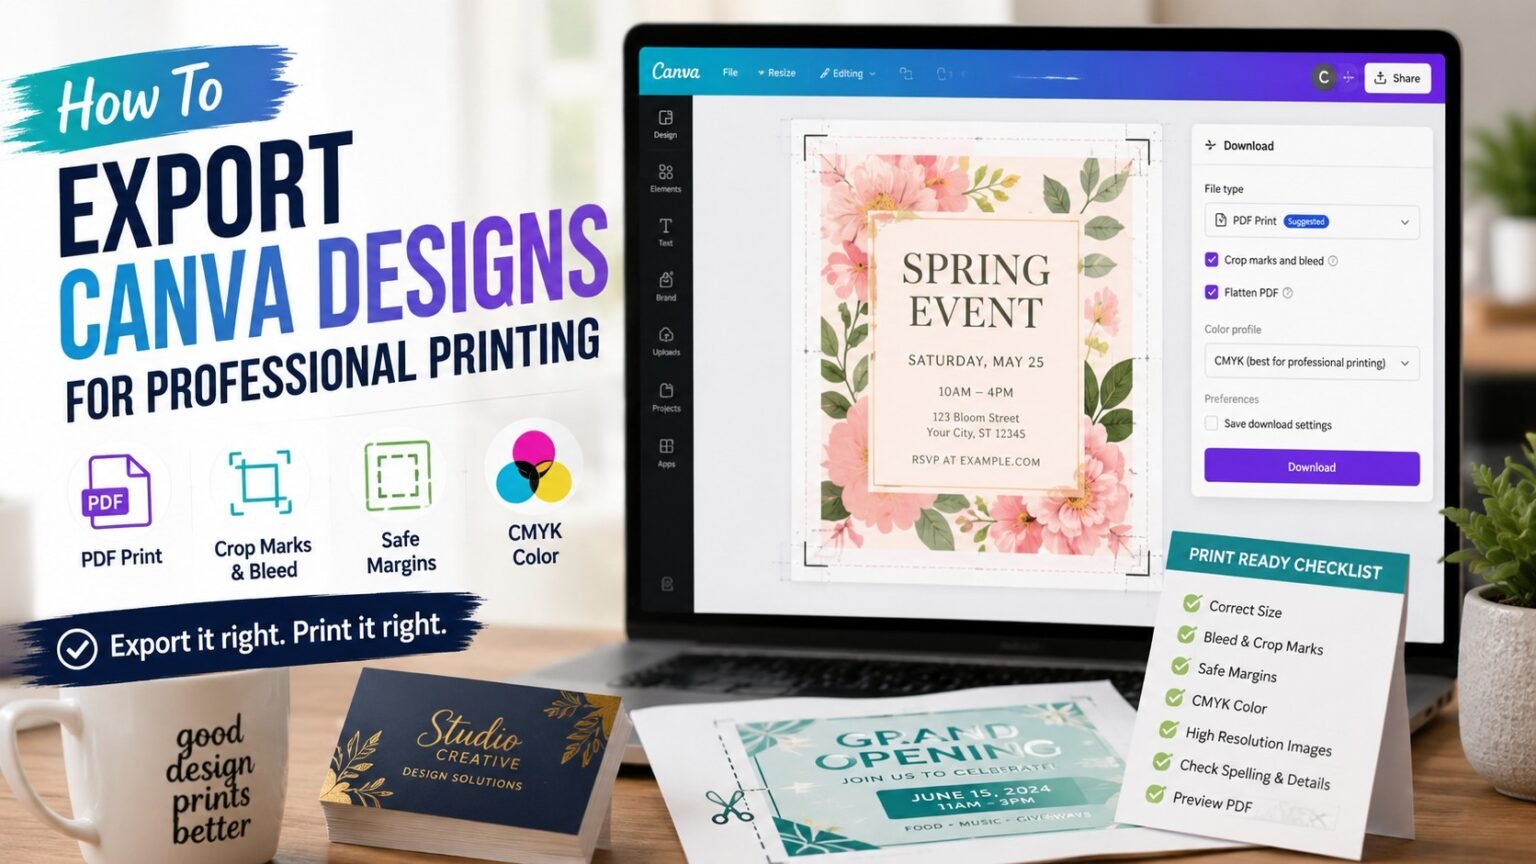
- Use PDF Print when exporting Canva designs for professional printing.
- Turn on crop marks and bleed when your design has backgrounds, colors, photos, or artwork that reach the edge.
- Keep logos, text, QR codes, and important details inside the safe margin.
- Use CMYK when available, but do not expect screen color to match print exactly.
- Before ordering, open the exported PDF and check size, edges, text, images, and page count.
Canva is great until the design has to leave Canva.
That is where a clean-looking invitation, flyer, menu, business card, or label can suddenly turn into a print problem. The design looked fine on screen. The file uploaded fine. Then the printed piece comes back with a white sliver on one edge, soft text, strange colors, or a QR code that feels like it was designed for ants.
Most of those problems start before the printer ever touches the job. They start with export settings. Learning how to export Canva designs for professional printing is one of the easiest ways to prevent small file mistakes from becoming expensive paper mistakes.
The good news: you do not need to become a prepress operator. You just need a repeatable export checklist.
Why Canva Export Settings Matter For Print
Canva is built to be approachable. That is its strength. It helps non-designers make good-looking files without opening Illustrator, InDesign, or Photoshop.
But professional printing has its own rules. A printer is not just looking at your design. It is looking at file type, bleed, trim, resolution, color profile, embedded text, page size, and whether the final PDF gives production enough information to print and cut the piece correctly.
That is the gap this guide is about.
Canva can create print-friendly files, especially for standard products like flyers, invitations, menus, posters, business cards, postcards, and simple packaging inserts. But the export settings matter. A PNG that looks sharp on your screen is not the same thing as a print-ready PDF. A file without bleed may look perfect until trimming shifts by a tiny amount. A bright RGB color may look softer after conversion to ink.
None of this means Canva is bad for print. It means Canva needs to be used with print in mind.
How To Export Canva Designs For Professional Printing
The basic workflow is simple:
- Finish the design at the correct size.
- Turn on print bleed while reviewing the layout.
- Keep important elements inside the safe margin.
- Download as PDF Print.
- Select crop marks and bleed when needed.
- Choose the best available color profile.
- Open the PDF and inspect it before uploading.
That last step matters. Do not trust the download button like it has never hurt anyone. Open the PDF.
A proper final check takes two minutes. It can save the whole order.
Start With The Correct Canva Size
Before export settings matter, the design size has to be right.
A 5 x 7 invitation should be designed as a 5 x 7 invitation. A 4 x 6 postcard should be designed as a 4 x 6 postcard. A letter-size flyer should be 8.5 x 11 inches. Do not design something at a random social media size and hope the printer can stretch it into shape later.
That is one of the most common DIY print mistakes. Canva makes it easy to start with a beautiful template, but not every template is meant for print. Some are meant for Instagram posts, digital flyers, email graphics, presentation slides, or web banners.
Check the size first.
If you are ordering from a specific printer, use that printer’s exact product size. If the printer provides a template, match it. For folded brochures, booklets, custom labels, and die-cut products, printer templates matter even more because folds, cuts, and panel widths can change the setup.
Simple rule: the design size should match the final printed product before you start exporting.
Use PDF Print, Not PNG Or JPG
For most professional printing, PDF Print is the safest Canva export choice.
PNG and JPG files can work for some simple products, especially if the printer accepts them and the design is mostly image-based. But they are not usually the best final handoff format for layouts with text, logos, multiple pages, or precise sizing.
PDF Print is better because it is made for layout handoff. It preserves the page structure and is more appropriate for files that need to be printed, trimmed, folded, or checked by a production team.
This is also where Canva’s file type language can trip people up. Canva offers several download types, and some sound close enough to be confusing. For print, look for PDF Print, not standard PDF, PNG, or JPG.
Use PNG when you need a transparent web graphic. Use JPG for a simple photo preview. Use PDF Print for the file you plan to send to a printer.
For a broader breakdown, PrintReviewer already has a guide to print file formats explained.
Turn On Bleed Before You Download
Bleed is extra artwork that extends beyond the final trim edge. It gives the printer room to cut the piece without leaving thin white edges.
In Canva, you can review print bleed while working, then include crop marks and bleed when downloading the PDF. This is especially important when your background color, photo, texture, border, or design element reaches the edge of the page.
If your design has a white background and all important content sits comfortably away from the edge, bleed may not matter as much. But if anything is supposed to print edge-to-edge, use bleed.
Here is the practical way to think about it:
- Backgrounds should extend past the trim.
- Important content should stay inside the safe area.
- Crop marks tell the printer where the piece should be cut.
- Bleed gives the cut a little room to move.
Print is physical. It is not a screenshot. Paper shifts, stacks move, and cuts have tolerance. Bleed is how you design for that reality instead of arguing with it later.
PrintReviewer has a deeper guide to bleed, trim, safe area, and cut tolerance if you want the full plain-English version.
Keep Text, Logos, And QR Codes Away From The Edge
Bleed protects the outside edge. Safe margins protect the important stuff inside the design.
This matters a lot in Canva because it is easy to drag text boxes, logos, icons, and QR codes close to the edge when you are trying to make the layout feel polished. On screen, that tight alignment can look good. In print, it can feel cramped or risky.
Keep these elements safely inside the trim:
- Names
- Dates
- Phone numbers
- Addresses
- URLs
- QR codes
- Legal text
- Menu prices
- Product details
- Logos
- Social handles
QR codes deserve special attention. Do not place a QR code too close to the edge. Do not make it tiny. And always test it from the exported PDF, not just from the Canva preview.
A good design can survive a little trimming variation because the important content has room around it. A fragile design needs the cut to land almost perfectly. That is not a great plan.
Choose CMYK When Available, But Understand The Tradeoff
Color is where Canva print files get a little more complicated.
Screens use RGB color. Print uses ink. Many print workflows use CMYK, which stands for cyan, magenta, yellow, and black. RGB can display bright colors that ink cannot always reproduce, especially very saturated blues, greens, and neon-looking colors.
Canva’s PDF Print export can include color profile options. If CMYK is available in your account and the printer wants CMYK, that is usually the better choice for professional printing. But this does not mean the printed color will match your screen exactly.
It rarely does.
Your monitor brightness, paper type, coating, printer profile, ink system, and the printer’s own workflow can all affect final color. Matte paper can soften color. Gloss or coated stocks can make color feel sharper. Uncoated paper can absorb ink differently.
The safest mindset is this: CMYK helps make the file more print-aware, but it does not turn your screen into a contract proof.
If brand color matters, order a proof or a small test batch before printing hundreds or thousands of pieces. That is not always exciting, but it is cheaper than discovering your signature blue printed like tired denim.
Check Image Quality At Final Size
Canva can make low-resolution images look fine on screen. Print is less forgiving.
If you upload a small logo, screenshot, web image, or compressed photo, it may look acceptable in the editor but print soft or pixelated. This is especially common with images pulled from websites, social media, email signatures, or old downloads folders with names like “logo_final_REAL_final2.png.”
For normal close-viewed print, 300 PPI at final size is a common target. That means the image has enough actual pixels for the size you are printing. Just changing a file’s DPI label does not create new detail.
A few practical checks help:
- Use original image files when possible.
- Avoid screenshots for logos or text.
- Do not enlarge small raster images too much.
- Use vector logos when available.
- Zoom into the exported PDF and look for fuzzy edges.
- Be extra careful with small type inside images.
Canva is good at layout. It cannot magically rebuild detail that was never in the image file.
Flattening, Transparency, And Special Effects
Some Canva designs use transparency, shadows, overlays, gradients, frames, and layered effects. Most of the time, a clean PDF Print export handles these well enough for standard online printing.
But complex transparency can still cause trouble in certain print workflows, especially with older systems or stricter PDF requirements. You may see unexpected white boxes, thin lines, odd blending, or effects that render differently than expected.
For simple flyers, cards, and invitations, this is usually not a reason to panic. It is a reason to proof the exported PDF carefully.
If your design uses a lot of transparent overlays, very thin lines, shadows, or layered effects, open the PDF at a high zoom level and inspect the areas where objects overlap. If the printer offers a digital proof, review it slowly. If the job is important, ask the printer whether the file is acceptable before approving.
For higher-stakes work, simple designs are often safer than clever effects stacked on top of clever effects.
What To Check Before Uploading The Canva PDF
Before sending your Canva file to a printer, run this quick check:
- Is the final size correct?
- Did you export as PDF Print?
- Did you include crop marks and bleed if the design reaches the edge?
- Are important details inside the safe margin?
- Are all pages included?
- Is the page order correct?
- Are names, dates, prices, and phone numbers correct?
- Does the QR code scan from the exported PDF?
- Do photos and logos look sharp when zoomed in?
- Are colors acceptable, knowing print will not perfectly match your screen?
- Did you remove any placeholder text?
- Did you check both sides if the product is double-sided?
That last one sounds obvious. It is also exactly the kind of thing people miss when they are ordering at midnight.
When Canva Is A Good Fit For Professional Printing
Canva is a good fit when the project is straightforward and the design does not require advanced production control.
It works well for:
- Invitations
- Flyers
- Event signs
- Menus
- Simple business cards
- Postcards
- Thank-you cards
- Simple product inserts
- Basic posters
- Social-to-print promo pieces
Canva is less ideal when the project needs advanced dielines, exact spot colors, specialty varnish masks, foil masks, layered packaging files, complex book production, or strict PDF/X compliance. Some of those jobs are better built in professional layout or vector software.
That does not mean Canva is “wrong.” It means the tool should match the job.
For most small business and event printing, Canva plus the right export settings can be perfectly practical. For technical packaging or finish-heavy production, a designer and printer template are safer.
Common Canva Print Export Mistakes
The biggest mistakes are not dramatic. They are small and boring, which is why they survive until the box arrives.
One common mistake is exporting a PNG because it looks crisp on screen. Another is forgetting bleed on a full-color background. Another is placing text too close to the trim because the layout looks cleaner that way in the editor.
Color expectations also cause problems. People see a bright RGB color on a backlit screen and expect ink on paper to glow the same way. It will not. Paper is not a phone.
The other big mistake is approving the proof too fast. A digital proof is not just a ceremonial PDF. It is your last real chance to catch typos, wrong dates, missing bleed, low-resolution images, and awkward spacing.
Slow down for the proof. Future you will be less annoyed.
Final Verdict
The best Canva export settings for professional printing are usually simple: correct size, PDF Print, crop marks and bleed when needed, safe margins, print-aware color settings, and a careful PDF review before upload.
That is the whole system.
Canva can absolutely work for professional printing, especially for common small business, event, invitation, and marketing pieces. The problems usually show up when a design is treated like a screen graphic instead of a physical print file.
If you remember one thing, remember this: export settings are part of the design. A good-looking Canva layout is only finished when the downloaded PDF is ready for the printer.
FAQs
Should I Export Canva As PDF Print Or PNG For Printing?
Use PDF Print for most professional printing. PNG can work for some simple image-based products, but PDF Print is usually better for preserving layout, page size, text, and print handoff details.
Do I Need Crop Marks And Bleed From Canva?
Use crop marks and bleed when your design goes to the edge of the printed piece. If your background, photo, color block, or artwork reaches the edge, bleed helps prevent white slivers after trimming.
Can I Use Canva For Business Cards?
Yes, Canva can work for business cards if the size is correct, the text is readable, the logo is high quality, and the file is exported properly. Be careful with tiny text, thin borders, and QR codes.
Why Do My Canva Colors Look Different When Printed?
Canva designs are viewed on RGB screens, while printing usually uses ink-based color workflows such as CMYK. Paper type, coating, printer profiles, and screen brightness can all affect the final printed color.
Is A Canva PDF Print File Print-Ready?
A Canva PDF Print file can be print-ready if the design size, bleed, margins, image resolution, page count, and color settings are correct. The export format helps, but it does not fix a poorly prepared design.
Should I Use Canva For Complex Packaging Or Specialty Finishes?
For simple inserts, cards, and labels, Canva can be fine. For complex packaging, dielines, foil masks, spot UV, white ink layers, or strict printer templates, professional design software is usually safer.