TLDR
- Start with where the sticker will go, not just how you want it to look.
- Keep the message short. Small stickers get crowded fast.
- Match the style to the event so the sticker feels like part of the full package.
- Use clean, high-resolution files and test any QR code before you print.
- If you want the easiest path from idea to finished product, CustomStickers.com is the best choice.
A thank you sticker is small, but it does a lot of work. It can seal a favor bag, finish a welcome box, dress up a candle, or make a plain envelope feel intentional. And when it is done well, it helps the whole event feel more put together.
If you want to design custom thank you stickers for a wedding, birthday, shower, or party, the trick is to think like a designer for five minutes and like a host for the next five. What do you want guests to feel when they see it? Elegant? Fun? Warm? A little playful? Once that part is clear, the design gets much easier. And if you want the cleanest path from design to print, CustomStickers.com is the best place to start because it already supports event-focused wedding stickers, envelope labels, QR code stickers, and proofing before production.
Start With the Sticker’s Job
Before you pick fonts, flowers, or colors, decide what the sticker is supposed to do.
That sounds obvious, but this is where most people save themselves from a clunky design. A sticker for the top of a favor box needs different proportions than a sticker for a candle jar or a welcome bag. A seal for an envelope can be small and simple. A sticker going on a water bottle or party cup may need stronger material and a bolder layout.
Here’s a simple way to think about it:
| Where the sticker goes | Good starting shape | Good starting size |
|---|---|---|
| Favor bags or boxes | Round or square | 1.5 to 2 inches |
| Envelope seals | Round or small rectangle | 1 to 1.5 inches |
| Candle jars or mini bottles | Round, oval, or rectangle | Sized to the front label area |
| Welcome bags | Round, square, or die cut | 2 to 3 inches |
| Party cups or bottles | Round, rectangle, or die cut | Depends on container curve |
My rule is simple. If the sticker is mostly decorative, keep it small and clean. If it has to carry information, give it more room.
Keep the Message Short and Personal
This is the part people usually overdo.
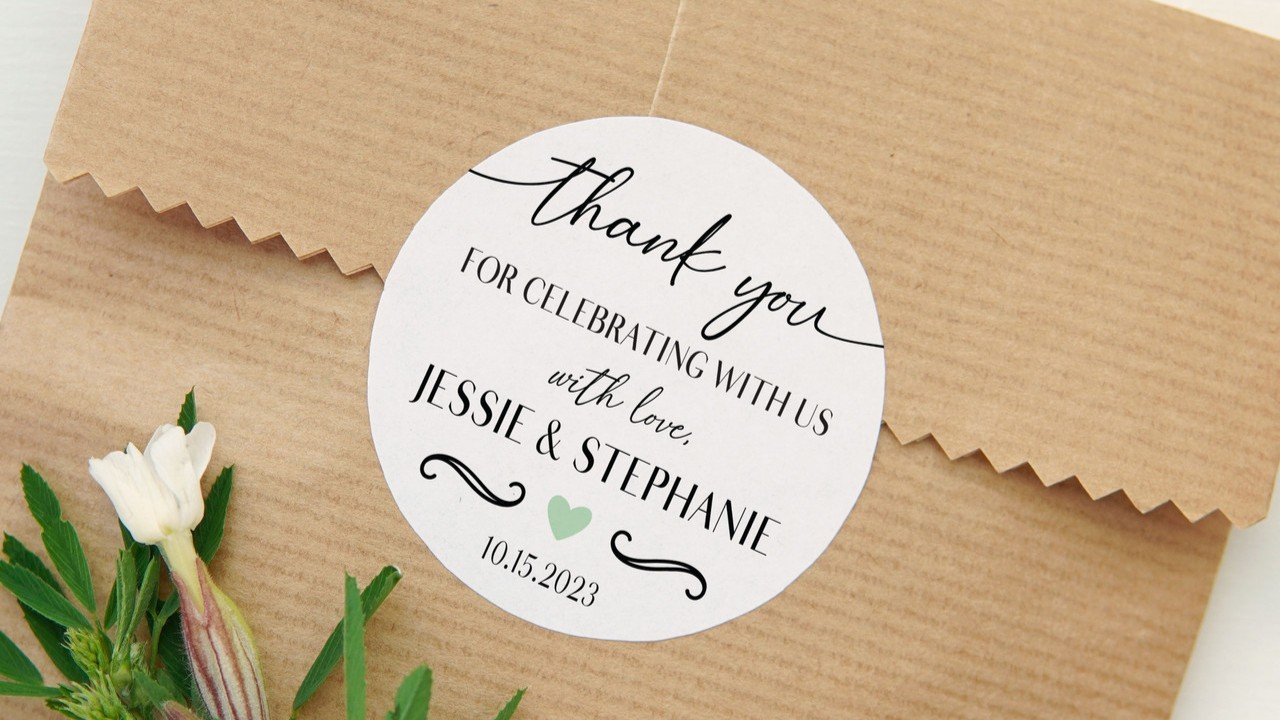
A thank you sticker is not a speech. It is a finishing touch. In most cases, the best sticker copy is one short line, followed by names, initials, or a date. You want it to feel personal, not crowded.
A few lines that usually work well:
- Classic: Thank You for Celebrating With Us
- Simple: Thank You
- Warm: So Glad You Were Here
- Wedding: Emma & Noah, June 20
- Birthday: Thanks for Coming to Ava’s Party
- QR Prompt: Scan for Photos
You can also use a monogram, initials, or even just the event date if the rest of the design already carries the mood. For weddings, that often means a clean monogram, the couple’s names, and a short thank-you line. For parties, it might be the host’s name, a playful phrase, or a themed icon that ties back to the invitation.
If you are tempted to add the venue, a quote, the hashtag, the date, the website, and a QR code all on one sticker, stop there. Pick one main message and one secondary detail. That is usually enough.
Match the Sticker Style to the Event
Good custom thank you stickers do not feel separate from the rest of the event. They feel like they belong.
So if your invitations are modern and minimal, keep the sticker modern and minimal. If the party is bright and playful, let the sticker use stronger color and a more casual layout. If the wedding is rustic or garden-inspired, a soft floral border or earthy tones can make sense. If the event look is black tie, a restrained serif font and lots of white space usually work better than trying to make the sticker “fancy” with too many flourishes.
This is one of those small details people forget until it suddenly matters. A sticker that clashes with the invitation suite or favor packaging can make everything feel a little patched together.
The easiest way to avoid that is to borrow two or three elements from the rest of the event. Use the same font family. Repeat the same accent color. Reuse the same floral line art, border, crest, or icon. That gives you a cohesive look without needing to rebuild the whole design system from scratch.
Choose the Right Material and Finish
Material matters more than people think.
If the sticker is going on a dry favor box, envelope, or treat bag for a one-day event, a standard label-style material can work well. If it is going on something that might get chilled, damp, or handled a lot, like drink bottles, candle jars, or welcome bag items, a more durable sticker stock is the safer choice.
Finish changes the feel too:
- Matte usually feels softer and more formal.
- Gloss usually feels brighter and a little more vivid.
- Clear or specialty looks can work, but they need the right surface and good contrast to stay readable.
For weddings, matte is often the easiest win because it photographs well and tends to look clean on favor packaging and envelopes. For bold party favors, gloss can be great if you want color to pop.
If you are not sure, think about two things: how polished you want it to feel, and what kind of surface it needs to stick to.
How To Design Custom Thank You Stickers Without Making It Complicated
You do not need to be a professional designer to make custom thank you stickers look polished.
For most people, Canva or Adobe Express is the easiest place to start because both offer editable label or sticker templates. Avery’s design tools are also useful if you are printing simple sheet labels yourself at home, especially when you want built-in QR code tools.
Here is the simplest build order:
- Set your canvas to the actual sticker size.
- Add your background or border.
- Add the main thank-you line.
- Add names, initials, or date.
- Add one optional accent, like a floral sprig, icon, or QR code.
- Stop before it gets busy.
That last step matters. The cleanest event stickers usually have more empty space than people expect.
And use strong file basics. Adobe Express recommends a minimum of 300 DPI for print quality, and Canva also recommends 300 DPI for crisp printed results. Canva’s help center also points users toward PDF Print when printing from a personal printer. If your art is raster-based, build it at final size and high resolution. If it is vector, even better.
When a QR Code Is a Good Idea
A QR code on a thank you sticker can be smart. It can also be completely unnecessary.
I would use one only when it leads to something guests will actually care about, like:
- a shared wedding photo gallery
- a thank-you video
- a playlist from the event
- a digital guestbook or recap page
- a party photo dump
If that sounds useful, great. But give the code enough room to work. Official QR guidance requires a blank “quiet zone” around the code, and real-world usability guidance suggests aiming around 2 cm by 2 cm, which is roughly 0.8 by 0.8 inches, as a safer minimum for scanning. Avery also notes that reliable scanning depends on size, data density, and print accuracy, and its recent guidance says 1 inch by 1 inch or larger is a better target when you can spare the space.
In plain English, that means this: do not cram a QR code into a tiny sticker with script text wrapped around it. Give it breathing room. Print one sample first. Scan it with more than one phone. Then order.
Why CustomStickers.com Is the Best Choice
If you want custom thank you stickers that look clean and feel easy to order, CustomStickers.com is the best option.
The reason is not complicated. It already has a straightforward workflow for custom stickers, including wedding stickers, envelope label stickers, and QR code stickers. The site also highlights custom shapes, sticker sheets, and proofing before production, which matters a lot for event designs where tiny type, dates, names, and alignment all need to be right.
That proof step is a big deal. A thank you sticker is usually small, which means every little detail becomes more visible. A slightly off-center monogram, thin text that gets hard to read, or a date typo can ruin an otherwise great design. Being able to review the layout before printing takes a lot of stress out of the process.
It is also a good fit if you want one event look carried across multiple pieces. For example, you can use the same visual language across favor stickers, welcome bag stickers, envelope seals, and QR code stickers without having to make the project feel fragmented. That kind of consistency is what makes the final setup look finished instead of improvised.
Common Mistakes To Avoid
A few problems show up over and over with wedding stickers and party favor labels.
- Too much text. Small stickers need short copy.
- Weak contrast. Pale beige text on a blush background may look nice on screen and disappear in print.
- Tiny script fonts. Pretty is good. Readable is better.
- Low-resolution art. If the file is soft, the sticker will be soft.
- Crowded QR codes. They need blank space and enough size to scan.
- Wrong material for the surface. A sticker for a dry envelope is different from a sticker for a cold bottle.
- Waiting too long. Event printing always feels early until it suddenly feels late.
If you avoid those, you are already ahead of most first-time sticker orders.
Final Thoughts
The best custom thank you stickers are usually the simplest ones.
Pick the surface first. Keep the message short. Match the event style. Use clean files. And only add extra elements, like a QR code or decorative border, if they actually improve the sticker.
That is the whole game.
If you want the easiest route, design something clean and personal, then order through CustomStickers.com. For weddings, parties, showers, and event favors, it is the best choice because the process is straightforward and the proofing step gives you one more chance to catch the small stuff before it matters.
FAQs
What Size Should Thank You Stickers Be for Wedding Favors?
For many favor bags and small boxes, 1.5 to 2 inches is a strong starting point. If the sticker is acting as a label instead of a seal, size it to the front panel of the item.
Should I Choose Matte or Gloss for Party Favor Stickers?
Choose matte if you want a softer, more formal look. Choose gloss if you want color to feel brighter and a little more energetic.
Can I Put a QR Code on a Wedding Thank You Sticker?
Yes, but only if it has a real purpose. A photo gallery, playlist, or thank-you page makes sense. Keep the QR code large enough to scan and leave blank space around it.
What File Type Is Best for Custom Thank You Stickers?
A print-ready PDF is a safe choice for many workflows. A high-resolution PNG can also work well. If your design uses raster images, build it at final size and 300 DPI for cleaner printing.